A buttery, crisp shell, a layer of jammy caramelized onions, Gruyère, and browned tomatoes. The ingredients in this tomato tart haven’t changed since my original version in 2020. My equipment has, and that changes the procedure more than you might expect.
We tend to think of equipment as good or bad. But a stainless steel skillet and a nonstick skillet can both make excellent caramelized onions. They simply need different methods. A tart ring and a removable-bottom tart pan can both make a beautiful crust, but only one lets me skip pre-baking for this tart.
So yes, there is a recipe here. But the more useful lesson is understanding how to adapt it to your kitchen instead of treating every temperature and timing as a commandment.
Table of Contents
- What You'll Learn
- The Equipment Determines the Method
- Ingredients and Make-Ahead Plan
- Day 1: Make the Pie Dough
- Day 1: Caramelize the Onions
- Day 2: Roll the Dough and Fit the Tart Ring
- Day 2: Fill and Bake
- Adjust the Bake to Your Baking Sheet and Oven
What You'll Learn
- A tart ring lets this tomato tart develop a crisp bottom without pre-baking the shell.
- Traditional stainless steel caramelized onions need browning first, followed by gentle sweating.
- Squeezing and resting the dough, rather than stretching it, helps limit shrinkage.
- Baking sheet color and oven position determine how to adjust the baking temperature.
The Equipment Determines the Method
There are three equipment choices to keep in mind before you start:
- The onion skillet: In stainless steel, I brown the onions first, then sweat them gently. The fast nonstick method reverses that order.
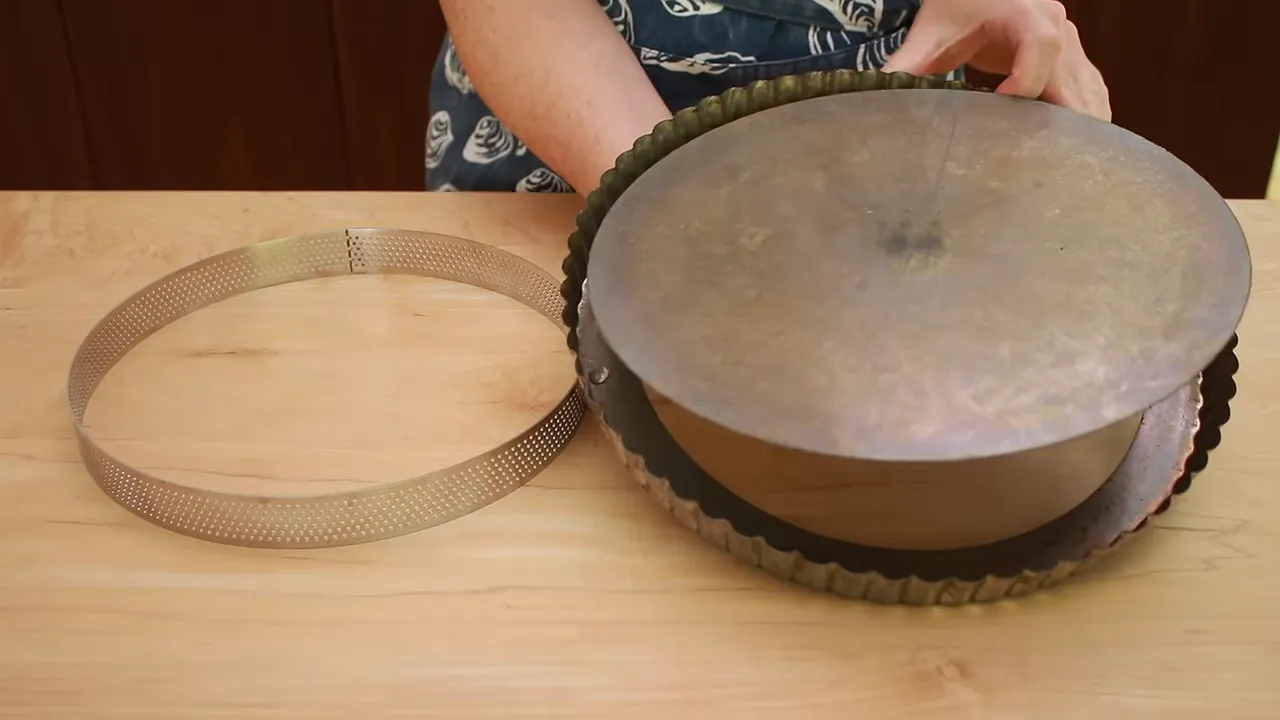
- The tart mold: A bottomless tart ring lets the dough sit on the parchment-lined baking sheet, helping the bottom brown without pre-baking. A removable-bottom tart pan needs a pre-baked shell for this recipe.
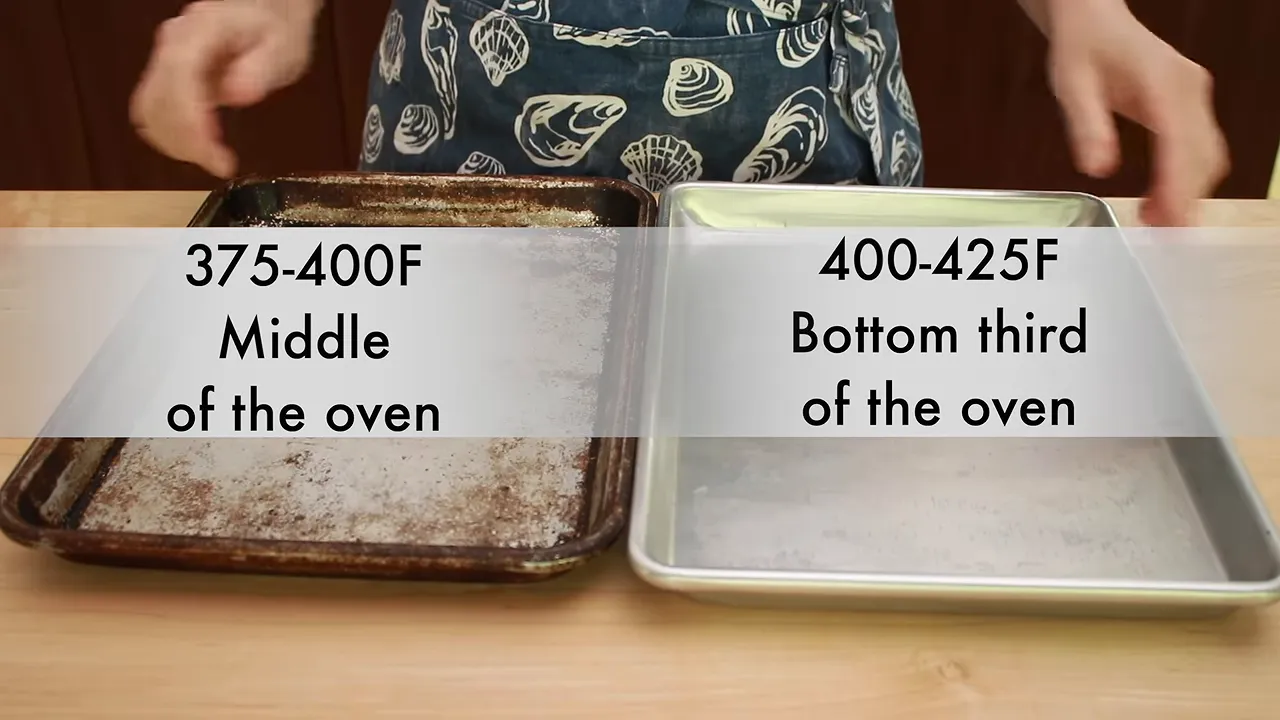
- The baking sheet: Dark and shiny sheets do not brown the crust at the same rate. A shinier sheet generally needs more heat and a lower oven position.
My preference is a 9-inch (23 cm) tart ring on a parchment-lined baking sheet. Here is the tart ring I use, an affiliate link. The instructions below follow that setup, with adjustments for other equipment where they matter.
Ingredients and Make-Ahead Plan
The assembly quantities make one 9-inch tart. The dough makes three shells, and the onion batch fills two tarts. You can save the extras for another project rather than doing all this work for exactly one dinner.
I like to make the dough and onions on day one, then roll, shape, fill, and bake on day two. The dough needs at least 2 hours in the refrigerator, but overnight is my preferred plan.
Pie dough: enough for three 9-inch tart shells
- 212 g unbleached all-purpose flour, for the food processor
- 2 teaspoons Diamond Crystal kosher salt, or 1 teaspoon table salt
- 26 g (2 tablespoons) granulated sugar
- 284 g (2½ sticks) cold unsalted butter, sliced ¼ inch thick
- 142 g unbleached all-purpose flour, for the mixing bowl
- 57 g very cold water
- 57 g very cold, unflavored vodka
I use King Arthur all-purpose flour. Keep the two flour portions separate because they go into the dough at different stages. Weighing is particularly useful here; for general baking conversions, King Arthur’s ingredient weight chart is a handy reference.
Caramelized onions: enough for two 9-inch tarts
- 3 pounds (about 1,360 g) whole yellow onions, to peel and slice pole to pole
- ⅓ cup olive oil, plus more if the pan becomes dry
- 2 teaspoons Diamond Crystal kosher salt, or 1 teaspoon table salt
- About 2 tablespoons water, for deglazing
- 1 teaspoon balsamic vinegar, or to taste
- Additional salt, to taste
To assemble one 9-inch tart
- 250 g prepared pie dough, about one-third of the dough batch
- Half the caramelized onion batch, cooled and drained of excess oil
- 70 g Gruyère, grated on the large holes of a box grater
- 400 g cherry tomatoes, halved, or Campari tomatoes, cut into quarters or smaller pieces as needed
- 1 to 2 teaspoons reserved onion-cooking oil
- A generous pinch of salt, for the tomatoes
Buy roughly ¼ pound of Gruyère to allow for the rind.
Day 1: Make the Pie Dough
Process the butter thoroughly
Put the sliced butter on a plate and chill it in the refrigerator for 30 minutes or the freezer for 15 minutes.
- Put the 212 g flour, salt, and sugar in a food processor. Process for 5 seconds to combine.
- Distribute the cold butter evenly over the flour.
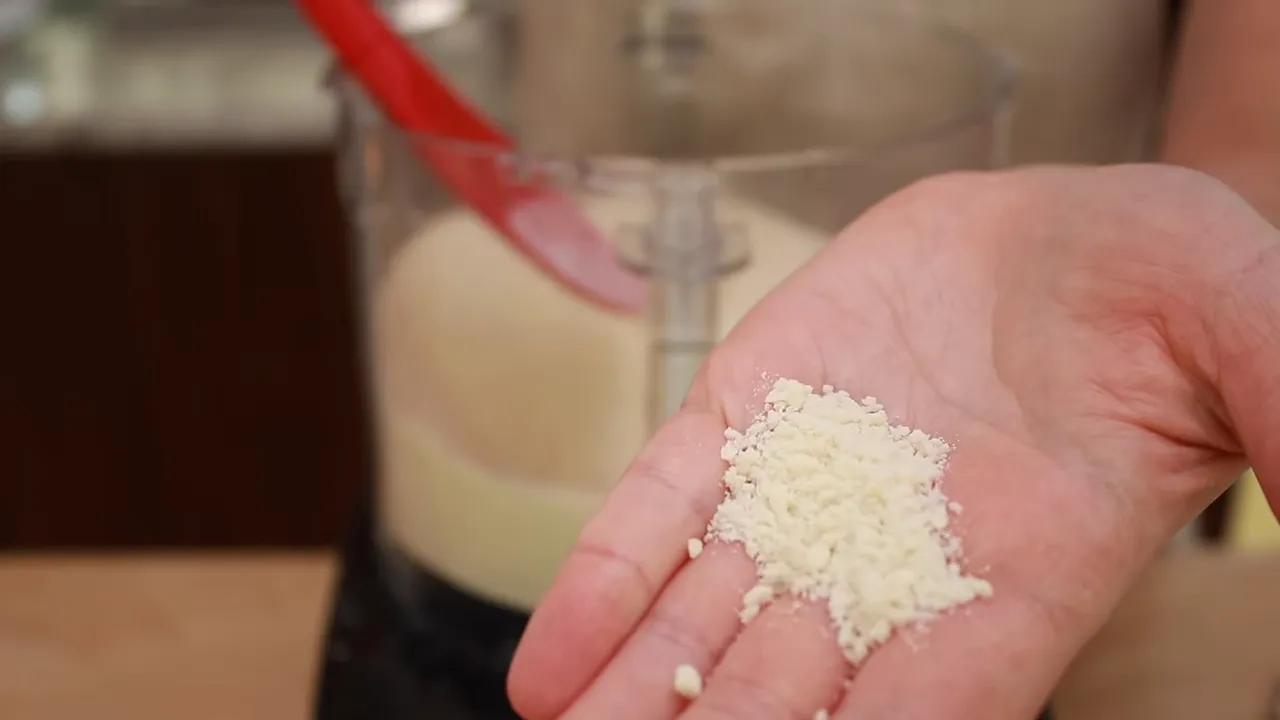
- Give it about fifteen 1-second pulses. These should be real, full-second pulses, not little taps.
- Stop when the mixture resembles finely grated Parmesan.
At this stage, the mistake to avoid is underprocessing the butter. We are not looking for pea-size pieces. Take it all the way to that fine, grated texture.
Add the remaining flour, then the liquid
Put the remaining 142 g flour in a large bowl. Add the food processor mixture and toss thoroughly for 45 to 60 seconds. There is no need to be timid here. Without the liquid ingredients, gluten development is not yet the concern.
Combine the cold water and vodka. Cheap, plain vodka is what you want. This is not the place to get creative with flavors.
Add the liquid to the flour mixture. Use a large spoon or silicone spatula to mix with cutting motions. I prefer a spatula because I can also press with its back to help the dough stick together.
Squeeze the crumbs into dough
Once the liquid is reasonably evenly distributed, squeeze the mixture into fistfuls. Some crumbs will fall out. That is normal. Pie dough does not become a tidy ball the moment the liquid goes in.
Work the small clumps into larger clumps, using squeezing rather than repeated folding. This helps limit gluten development. If dough sticks to your hands, scrape it off with a spatula or pastry scraper and return it to the bowl.
Eventually, combine the larger clumps into one mass. Press it firmly into the crumbs at the bottom of the bowl. Flip it occasionally: the top tends to be stickier than the bottom, so turning it helps collect the remaining crumbs. A couple of final folds are fine.
Portion and chill
For 9-inch tarts or free-form galettes, divide the dough into three portions of about 250 to 255 g each. A small bowl lined with plastic wrap makes weighing and wrapping easy.
Shape each portion into a disk, wrap tightly, then flatten gently with a rolling pin. Make the disks as round as you can now, and rolling later will be easier.
- Refrigerate: At least 2 hours, preferably overnight, or up to 5 days.
- Freeze: Put the wrapped disks in a freezer bag for future use. Transfer a frozen disk to the refrigerator 24 hours before using.
- For larger shells: Instead of three small disks, divide the batch into two portions of about 380 g each for 11-inch tarts or 9-inch pies.
Day 1: Caramelize the Onions
Slice pole to pole
Cut off the onion tops and roots, then halve the onions pole to pole. Peel them, removing the first fleshy layer too if it is tough or unappealing. That first “good” layer is often not so good.
Slice each half pole to pole rather than across into semicircles. This gives more even strips that cook more evenly and have a better texture. As the onion becomes unstable near the end, tilt it forward to finish slicing.
Choose the method that fits your skillet
The traditional stainless steel method takes about 40 to 50 minutes: brown first, then sweat gently. I keep coming back to it because I like the ritual. It is long, but forgiving, and the gentle stage can happen while I do something else in the kitchen.
The fast caramelized onion method takes about 20 to 25 minutes. It starts by sweating the onions in water, which brings sugars to the surface and allows very fast browning afterward.
But those onions become extremely sticky. That method needs a Teflon nonstick skillet; even well-seasoned cast iron or carbon steel is not nonstick enough. It also requires constant attention because the onions can go from brown to burned very quickly.
For this tart, I’m using the traditional stainless steel method.
Brown first, without constant stirring
- Set a 12-inch stainless steel skillet over medium-high heat and add the ⅓ cup olive oil.
- When the oil is very shimmery, test it with one piece of onion. Once it sizzles energetically, add the remaining onions and the salt.
- Mix to distribute the salt, then leave the onions alone until the bottom browns. The first browning may take about 5 minutes.
- Stir, then leave them undisturbed until the bottom browns again. Repeat, checking more frequently as cooking progresses.
Yes, that seems like a lot of oil. It is important for the flavor and texture, and we will drain off the excess later.
Stirring constantly prevents the onions from developing color. Check a few spots periodically, but give them time against the hot pan. After stirring, tuck stray onions back into the main pile so they do not dry out along the sides.
If the pan looks dry, add a little more oil. If the onions or the brown bits on the pan are turning black rather than brown, lower the heat slightly. This stage usually takes about 20 minutes and roughly six stirrings.
Then sweat until jammy
Once the onions have plenty of color and the skillet has a good layer of brown bits, reduce the heat to low. Add a little water, about 2 tablespoons, and scrape the browned deposits back into the onions.
Continue cooking over low heat for another 20 to 30 minutes, stirring occasionally with a flat wooden spoon. At this lower heat, the onion juices evaporate more slowly and become syrupy, giving the onions their jammy consistency.
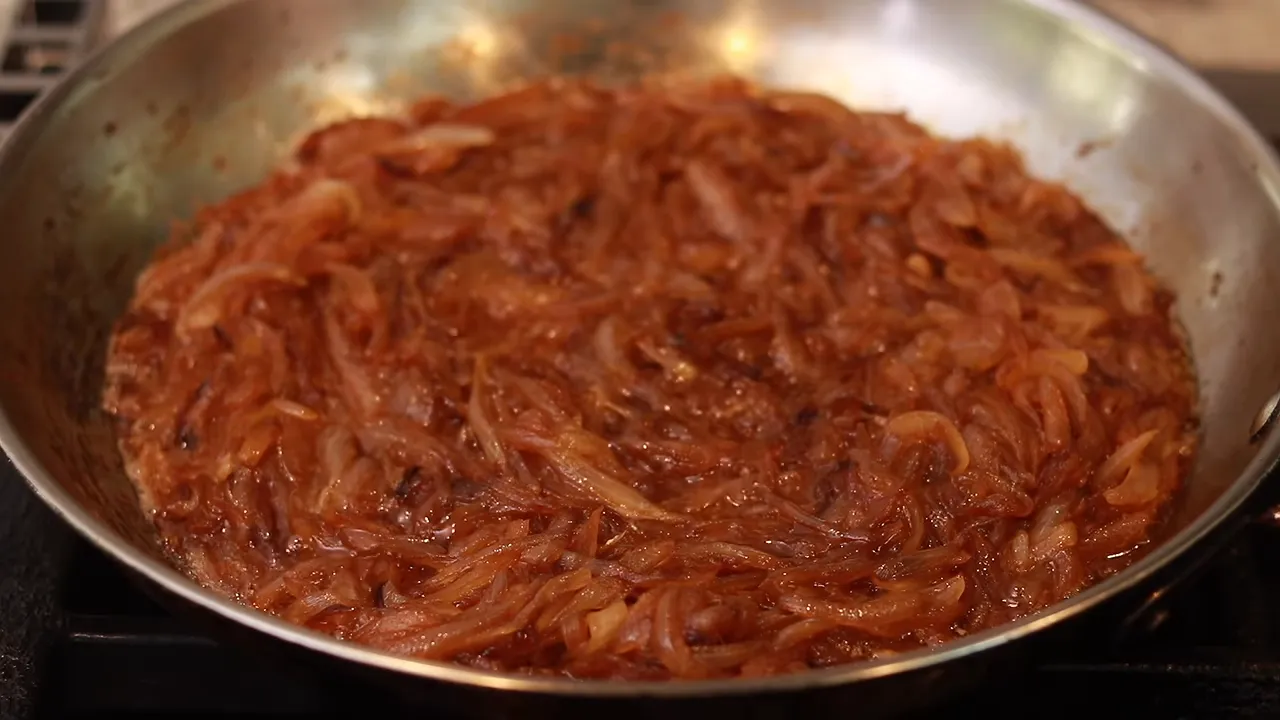
The finished onions should be very soft, evenly mahogany brown, and glossy. Add the balsamic vinegar and another pinch of salt if needed. Stir for about a minute to collect any remaining brown bits, then take the pan off the heat.
Drain the excess oil and save it
These onions are going into buttery pastry, so we do not need all their cooking oil in the filling.
Tilt the skillet and move the onions to the higher side, letting the oil collect below. Give the onions an occasional stir to help the oil escape. Allow about 5 minutes for draining.
Transfer the onions and oil to separate containers. Cool, cover, and refrigerate for up to a week. Save the oil: a little will coat the tomatoes, and the rest is excellent for dipping bread or tossing with pasta and vegetables.
Day 2: Roll the Dough and Fit the Tart Ring
Make cold dough pliable before rolling
Sprinkle the counter and a disk of dough with flour. Give the dough firm taps with the rolling pin, keeping its thickness even. This makes the butter pliable without waiting for the dough to warm up.
Little cracks around the edges are normal, but fix them now. Small cracks become large ones as you roll. Squeeze the edges firmly until you have a reasonably smooth circle.
Roll from the middle away from you, then from the middle toward you. Rotate the dough after every pair of strokes. That rotation keeps the shape even and tells you about sticking before it becomes a disaster.
If the dough stops moving easily, loosen it with a pastry scraper and add flour underneath.
I like a tapered French rolling pin because it lets me direct pressure to particular areas and correct an uneven shape. Any rolling pin will work, but the French rolling pin tutorial explains how to use that extra control.
Roll to about ⅛ inch thick, roughly 3 to 4 mm. If one area is thicker, angle the rolling pin to redistribute the dough rather than simply making the whole sheet larger.
Rest the rolled dough
Fold the dough in half and then into quarters for transferring, brushing away excess flour underneath if necessary. Move it to a parchment-lined baking sheet and unfold it.
Refrigerate for at least 20 to 30 minutes before fitting it into the ring. This gives the dough a chance to relax and reduces shrinking during baking. If you are truly in a rush, you can fit it immediately, but I prefer the rest.
After chilling, slide the parchment and dough off the cold baking sheet. Let the dough become pliable again, which usually takes about 2 to 5 minutes.
Fit without stretching
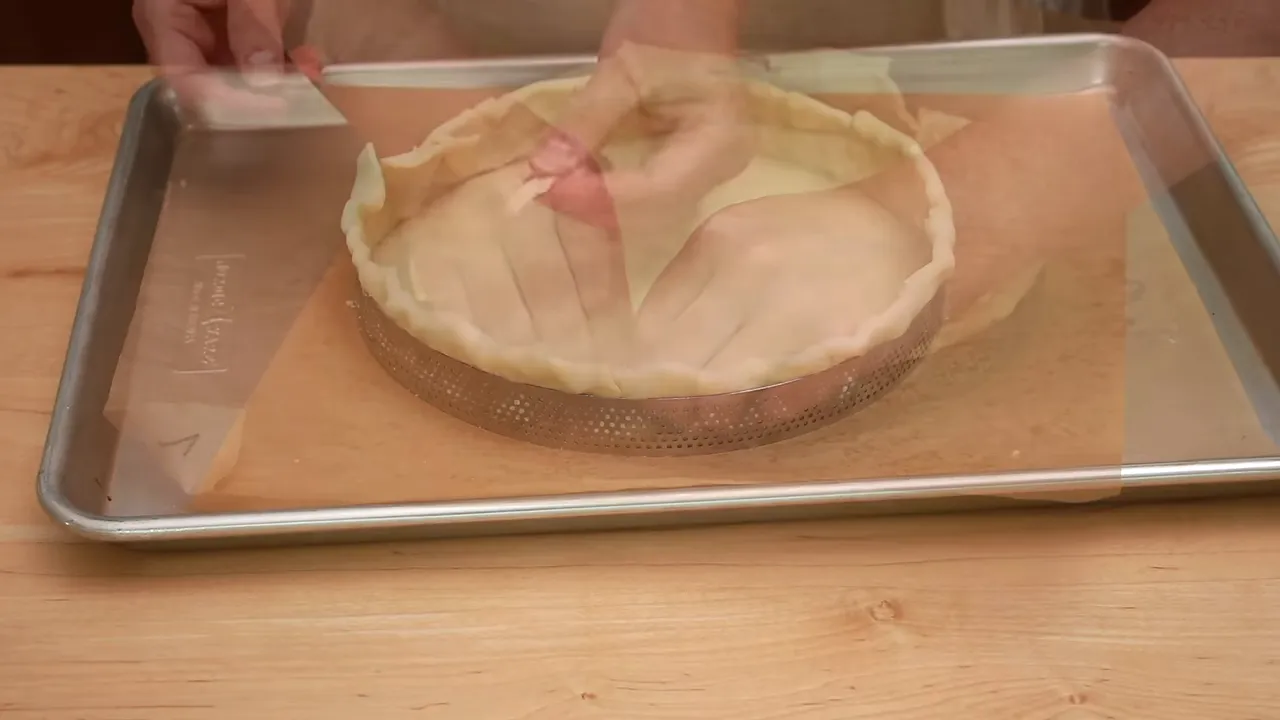
Set the tart ring on a parchment-lined baking sheet. Ease the dough into it by lifting the edges and lowering the dough into place, pressing firmly against the bottom corners and walls.
Do not stretch it. Whatever you stretch now will try to shrink in the oven.
- Trim the edges with kitchen shears, leaving about ¾ inch of overhang.
- Fold that overhang inward and press firmly against the sides to reinforce the rim.
- If a section has too much overlapping dough, cut some away.
- If another section is thin, tuck a scrap into the fold and press it in.
- Refrigerate the shaped shell for at least 30 minutes; an hour is a useful target if your schedule allows.
If chilling the rolled dough longer, cover it with plastic after the first 30 minutes. For the shaped shell, cover after the first hour.
Why this shell does not need pre-baking
A tart ring allows the dough to sit directly on the parchment-lined baking sheet rather than on a separate pan bottom. That setup browns the bottom faster and lets me bake this tomato tart in one go.
I previously used freezing as part of the no-pre-bake method. More testing showed that refrigeration works just as well. The baking surface is what makes skipping pre-baking possible, not freezing the dough. My refrigerator also has more room, which is not a small consideration.
This does not mean every tart can skip pre-baking. Custard tarts still need it. And if you are using a removable-bottom tart pan for this recipe, follow the pre-baking instructions for that pan before adding the filling.
Day 2: Fill and Bake
Prepare the tomatoes and layer the filling
Heat the oven to 400°F (200°C), with a rack in the bottom third. Having another rack in the upper third makes a final browning adjustment easier.
Cherry tomatoes about an inch in diameter are ideal. Halve those. Cut larger Campari tomatoes into four to six pieces as needed. If your tomatoes are very tiny, some can stay whole.
If you have several colors or shapes, keep them separate while preparing them so you can arrange a pattern.
- Spread half the cooled, drained onion batch evenly inside the chilled tart shell.
- Sprinkle with the 70 g grated Gruyère.
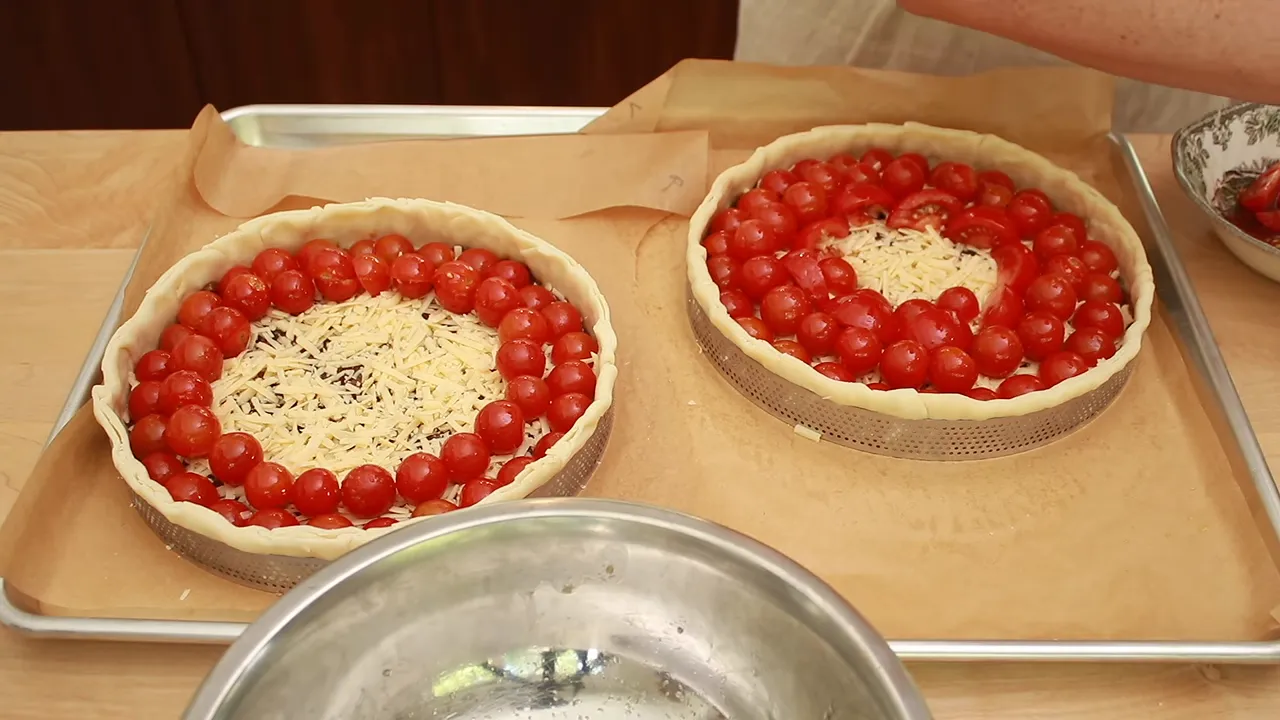
- Toss the tomatoes with 1 to 2 teaspoons reserved onion oil and a generous pinch of salt. The thin coating of oil helps them brown.
- Arrange the tomatoes over the cheese, cut side down where applicable, in circles from the outer edge toward the center.
Bake for color, not just the clock
Bake in the bottom third of the oven for 40 to 50 minutes, until the dough is golden brown and the filling is bubbling and browned.
If the tomatoes need a final boost of color, move the tart to the upper third and turn on the convection fan for the last few minutes, about 5 minutes if needed.
Let the tart cool until warm, about 15 minutes, then remove the ring and serve. If a little dough has baked over the outside of the ring, carefully trim that excess with a bread knife before lifting the ring off.
Adjust the Bake to Your Baking Sheet and Oven
The time, temperature, and rack position above are a starting point. I have made this tart in many ovens and on many baking sheets, and they do not all need the same treatment.
- Shiny baking sheets: Generally need a higher temperature and a lower oven position to brown the bottom.
- Darker baking sheets: Can brown the bottom at a lower temperature or with the tart positioned closer to the middle of the oven.
- Pre-baked tart shells: May need a lower temperature and a shorter bake once filled.
One reason I prefer not to pre-bake this particular tart is that the tomatoes need time to brown. With an already baked shell, the pastry edges can get too dark before the tomatoes develop enough color.
The goal is not simply to finish at 45 minutes. It is to bring the tomatoes, filling, and pastry to the right place together: browned tomatoes on top, jammy onions underneath, and a genuinely crisp bottom crust.
That is the useful part of understanding your equipment. Once you know what each piece changes, you can adjust the procedure instead of wondering why the same recipe behaves differently in another kitchen.
|


