An apple galette is my favorite apple dessert. Basically, it’s an easier, tastier apple pie. Baking it directly on a sheet pan gives the bottom crust a chance to become properly crisp, while the uncovered fruit gets beautifully caramelized. No pie plate, no top crust, and no elaborate decorating required.
But even a rustic dessert rewards a little attention to detail. Which apples hold their shape? Should you let them sit with sugar, or cook them before filling the dough? And what should you do about that gap that sometimes appears between the apples and the crust?
There are two delicious approaches: a classic French-style galette filled with raw, macerated apples, and a brown butter, rum raisin galette that wants to be an American apple pie. Neither is the correct answer for everyone. They simply give you different textures.
Table of Contents
- What You'll Learn
- The Best Apples for This Galette: Honeycrisp
- Raw or Precooked Apples? Embrace the Gap, or Reduce It
- Classic Apple Galette with Raw Apples
- Brown Butter Rum Raisin Apple Galette
- Making a Larger Galette
- Serving and Rewarming
What You'll Learn
- Honeycrisp held its shape better than Granny Smith in my side-by-side baking test.
- Raw apples shrink beneath the crust; partially cooking them produces a softer, more compact filling.
- Reduce the macerated apple juices during baking, then add apricot preserves for a glaze.
- Adjust the oven rack during baking to balance browning on the crust’s top and bottom.
The Best Apples for This Galette: Honeycrisp
Honeycrisp has long been my favorite baking apple. But many reputable sources recommend Granny Smith for its ability to hold its shape. Since I am perfectly capable of doubting myself over an apple, I tested three batches side by side:
- Supermarket Granny Smith
- Supermarket Honeycrisp
- Local farm Honeycrisp
In this test, the Granny Smith apples softened into mush surprisingly quickly. Both batches of Honeycrisp held their shape much better, with the supermarket Honeycrisp giving me the best texture.
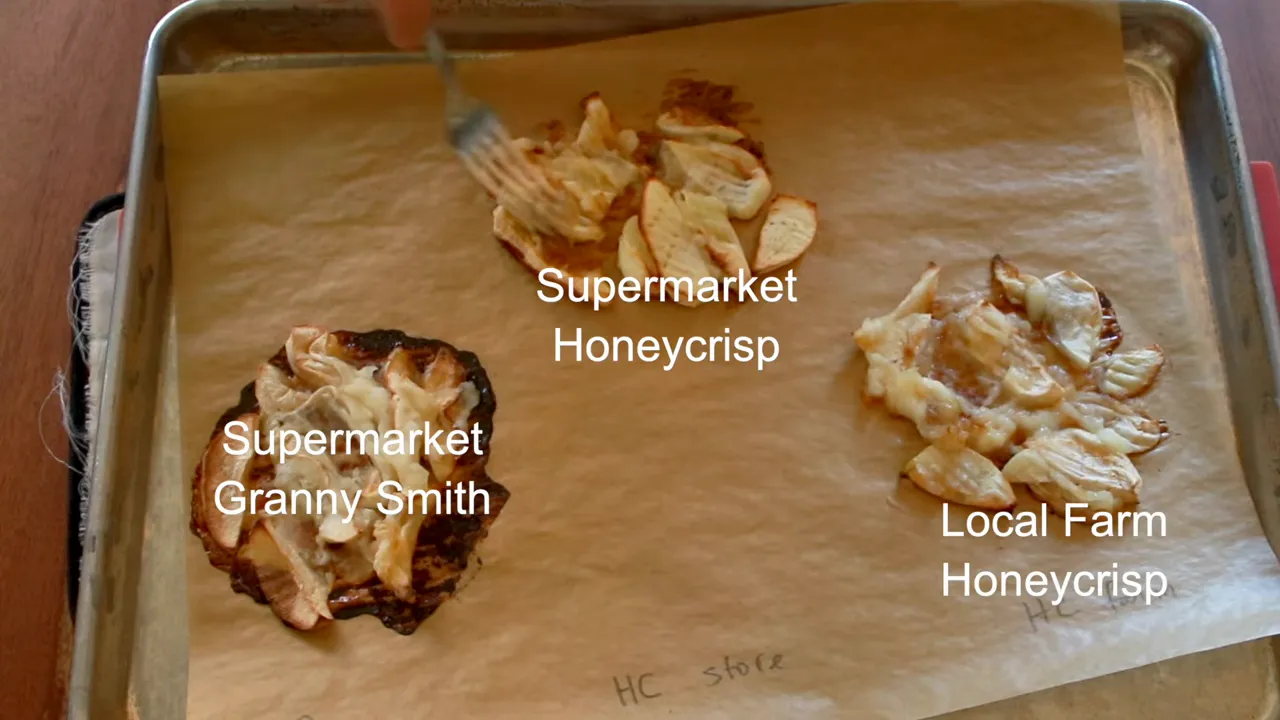
That does not mean supermarket apples are inherently better than local ones. I bought the supermarket apples on the day of the experiment, while the farm apples had spent close to a month in my refrigerator. Storage history matters.
Commercial apples are often held in a controlled atmosphere with reduced oxygen, which slows the changes that soften the fruit. A home refrigerator helps, but it cannot reproduce those conditions. For more background, the UC Davis apple storage guide explains commercial storage conditions.
For this galette, buy Honeycrisp close to the time you plan to bake, and keep the apples refrigerated until you use them.
Of course, baking is full of qualifications. A deep pie with a huge pile of raw apples might benefit from a softer variety. My recommendation here is for this relatively shallow, open-faced galette, not every apple dessert ever invented.
Raw or Precooked Apples? Embrace the Gap, or Reduce It
When you fill a galette with raw fruit, the apples shrink as they cook. The galette may look bubbly and full straight out of the oven, then develop a space between the filling and the folded crust as it cools.
My advice? Embrace the gap. It does not hurt the eating experience. If it interferes with your photograph, take the photograph from above. A very practical solution.
If the gap really bothers you, partially cook the apples first. They will do much of their shrinking before they go into the dough. The filling will also pack more closely together because some water has evaporated and there is less empty space between the pieces.
- Raw, macerated apples: More distinct apple pieces and a classic French-style result, with some shrinking beneath the crust.
- Partially cooked apples: A softer, more compact filling, closer in spirit to American apple pie.
And if we are going to cook the apples first, we might as well have some fun with brown butter, rum, and raisins.
Classic Apple Galette with Raw Apples
Serves 6. Allow 1 to 3 hours for the apples to macerate, roughly 50 minutes for baking, and at least 30 minutes for cooling. Use the color of the crust and the tenderness of the apples, rather than the clock alone, to judge doneness.
Ingredients
For the filling:
- 500 g Honeycrisp apples, weighed after peeling, coring, and slicing; buy about 1½ pounds whole apples to allow for waste
- 50 g granulated sugar, or 10% of the prepared fruit’s weight
- ½ teaspoon cinnamon, or to taste
- ½ teaspoon vanilla extract or paste
- 1½ teaspoons lemon juice
For assembly and glazing:
- 250 g pie dough
- 4 teaspoons granulated sugar, divided
- 1 tablespoon unsalted butter, melted; you might not need all of it
- 1 tablespoon apricot preserves
For the dough itself, use my pie dough recipe and rolling instructions. Vodka is not necessary.
1. Prepare and macerate the apples
Peel and core the apples. You can quarter them and trim away the cores, or halve them, trim the ends with a paring knife, and remove the cores with a melon baller.
Slice the apples about ½ inch thick and weigh out 500 g. Toss with the sugar, cinnamon, vanilla, and lemon juice.
Let the mixture sit at room temperature for at least 1 hour and up to 3 hours, tossing once or twice. Do not cook it. The sugar will draw out some apple juice, which you will reserve and turn into a glaze.
2. Prepare the dough and oven
Preheat the oven to 400°F (200°C) at least 30 minutes before baking. Your starting rack position depends on your baking sheet:
- Shiny baking sheet: Start in the bottom third of the oven.
- Dark baking sheet: Start in the middle of the oven.
Roll the 250 g portion of dough into a circle roughly 14 inches in diameter. Transfer it to a parchment-lined baking sheet and refrigerate for about 20 minutes while the oven heats. If it becomes too stiff to fold, let it stand at room temperature for about 5 minutes, until pliable.
3. Fill and fold
Sprinkle the center of the dough with 2 teaspoons of sugar, leaving a border about 2 to 3 inches wide.
Drain the apples through a strainer, reserving every bit of juice in a small saucepan. Arrange the drained apples in the center of the dough. Use only as much filling as you feel comfortable enclosing.
Position the outer apple slices with their curved sides facing out. That way, sharp corners are less likely to poke through the dough as you fold it.
Fold the border over the fruit, working around the circle and pinching each overlapping fold firmly together. Keep a finger inside the fold so you can press the layers against it. This is not a decorative little squeeze: poorly sealed folds can open in the oven.
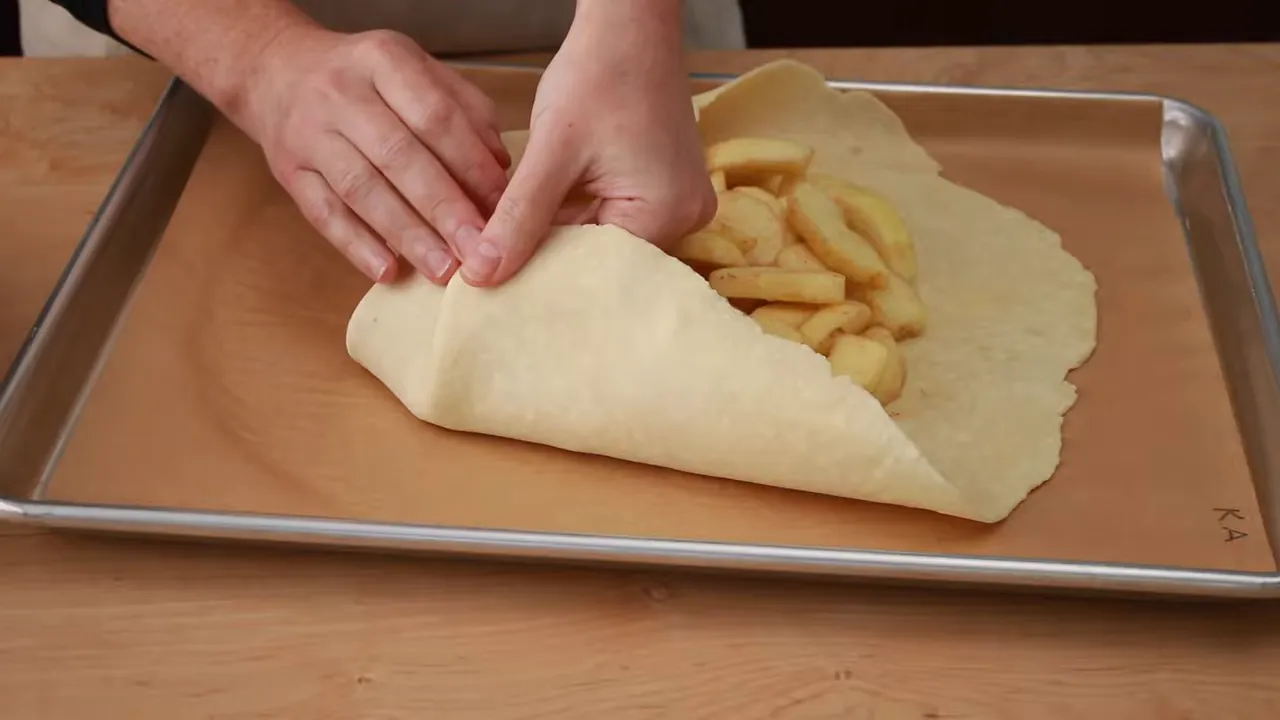
If the dough covers more fruit than you would like, gently turn its inner edges outward. This opens up the center and gives the finished crust a pretty shape.
Brush the dough with melted butter. Sprinkle the remaining 2 teaspoons of sugar over the galette, using about 1 teaspoon on the dough and 1 teaspoon on the apples.
4. Begin baking, then make the glaze
Bake for 20 minutes. Only then put the saucepan of reserved apple juice over medium heat and boil it down until syrupy.
Do not make this syrup too early. It can solidify as it sits, so you want to use it immediately after it is ready.
Remove the syrup from the heat and whisk in 1 tablespoon of apricot preserves. Whisk thoroughly. You may strain out any apricot pieces if you prefer a smooth glaze, but leaving them in is perfectly fine.
By this point, the galette will have baked for roughly 30 minutes. Drizzle all the glaze over the exposed apples and spread it evenly across the top.
5. Finish according to color and tenderness
Return the galette to the oven for about another 20 minutes, until the apples are browned and bubbly and the crust is fully brown.
Choose the rack position for this final stretch based on what needs more heat:
- Bottom crust already brown: Move the galette to the upper third to encourage more browning on top.
- Bottom crust still pale: Keep it lower in the oven.
- Top needs a final boost: If your oven has convection, use it for the last 5 minutes, checking closely to prevent burning.
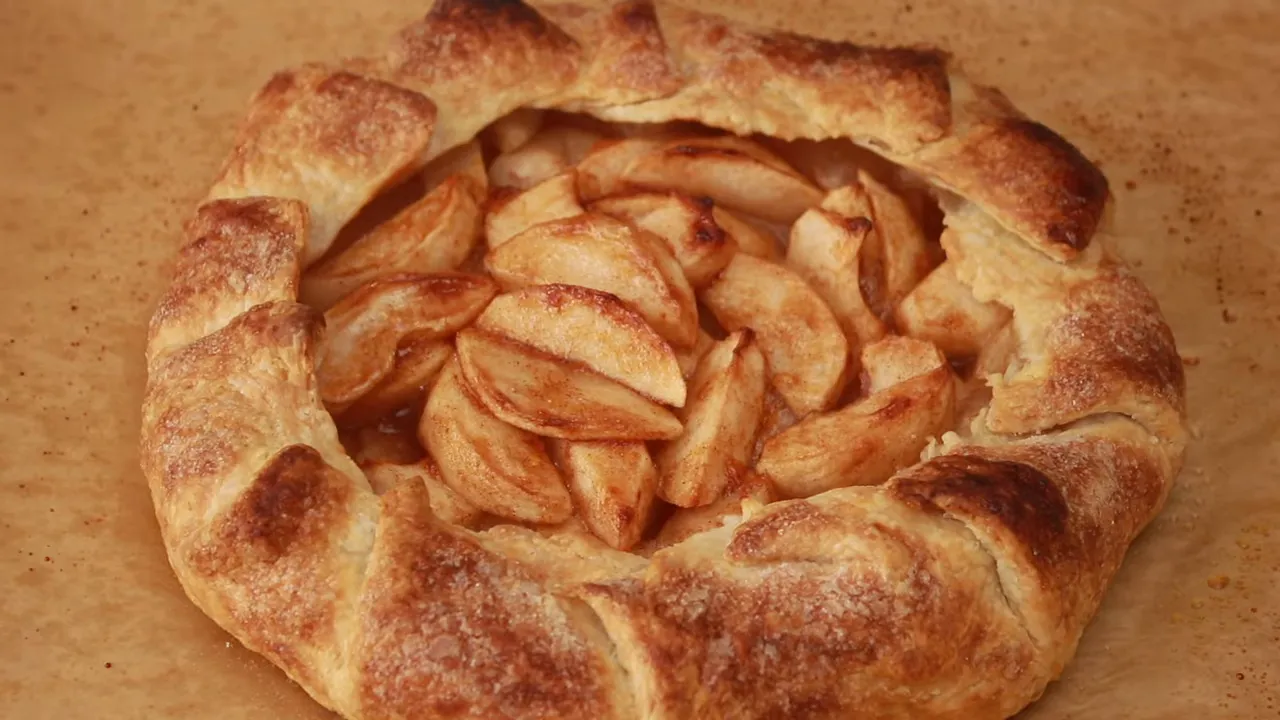
Check that the apples are tender. If the crust is ready but the apples are not, lower the oven to 350°F and continue baking until they soften.
Cool for at least 30 minutes before serving.
Brown Butter Rum Raisin Apple Galette
This version has a softer, more compact filling, with nutty brown butter, plump golden raisins, rum, and lemon zest. The filling is adapted from Polina Chesnakova’s cookbook Chesnok.
Use the same 250 g portion of pie dough, rolled to roughly 14 inches, and the same oven setup as for the classic galette.
Ingredients
For the filling:
- 75 g golden raisins
- 40 g rum
- 500 g Honeycrisp apples, peeled, cored, and sliced about ½ inch thick; buy about 1½ pounds whole apples
- 3 tablespoons unsalted butter
- ½ teaspoon cinnamon
- ½ teaspoon vanilla extract or paste
- Zest of ½ lemon
- 1 teaspoon lemon juice
- 50 g granulated sugar
- A tiny pinch of salt
For assembly and finishing:
- 250 g pie dough
- 4 teaspoons granulated sugar, divided as in the classic galette
- About 1 tablespoon unsalted butter, melted, for brushing the dough
- 2 teaspoons apricot preserves
- A few drops of water
If you prefer to omit the raisins, use an additional 100 g apples and 10 g sugar.
1. Plump the raisins
Combine the raisins and rum in a small microwave-safe bowl. Microwave just until the rum boils, about 20 to 30 seconds, depending on your microwave.
Let stand for at least 30 minutes, stirring occasionally, so the raisins become plump.
2. Brown the butter
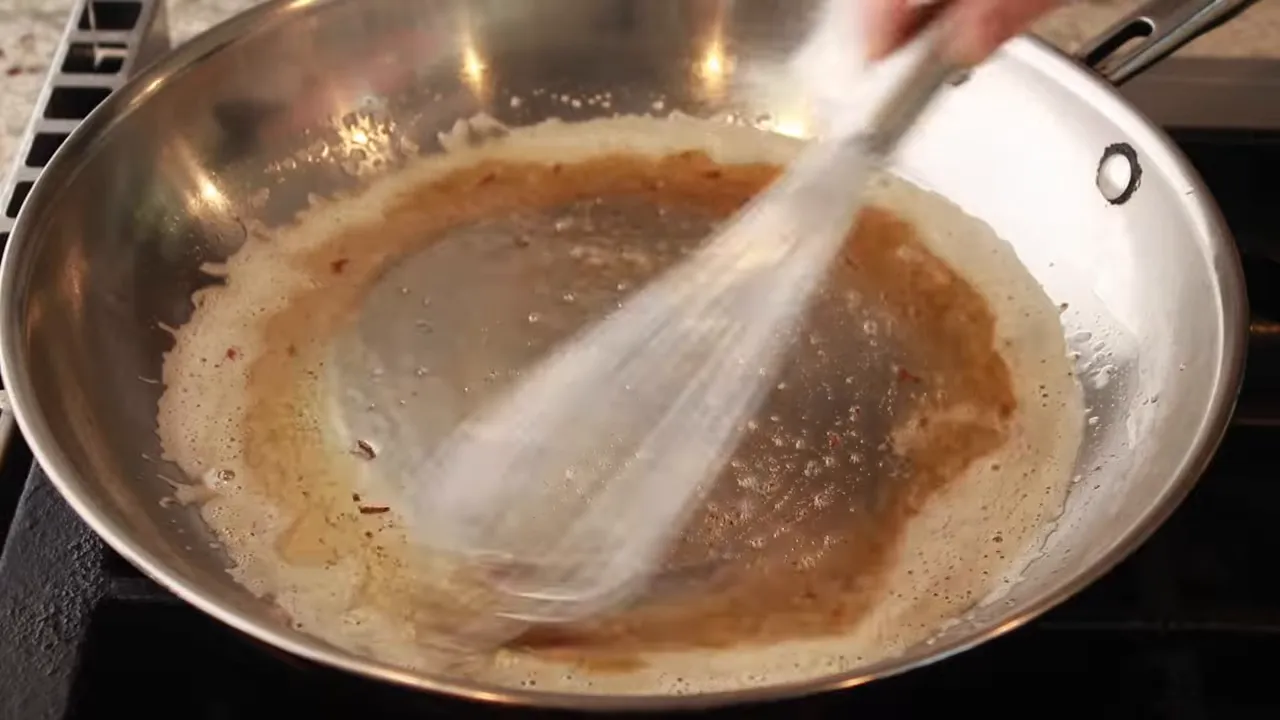
Heat 3 tablespoons of butter in a 12-inch stainless steel skillet over medium heat. Once it starts foaming, whisk frequently to help release steam and reduce splattering.
Stay with the skillet. You want brown butter, not burned butter. It is ready when you see brown specks and smell a pleasant, nutty aroma.
3. Partially cook the apples
Increase the heat to medium-high and add the apples. Stir to coat them in the butter, then leave them alone long enough to develop some color.
Continue cooking, stirring occasionally, until the apples have begun to brown and soften, about 5 to 10 minutes. Stop before they are fork-tender. A knife should still meet some resistance.
Take the skillet off the heat. Stir in the cinnamon, vanilla, raisins with their rum, lemon zest, lemon juice, sugar, and salt.
Transfer the filling to a bowl or plate and cool completely before putting it on the dough. To speed this up, spread it over a sheet pan and refrigerate until cool.
4. Assemble and bake
Prepare the dough as for the classic galette, including the 2 teaspoons of sugar beneath the filling. Place the cooled apple mixture in the center, fold the dough over it, and pinch the folds thoroughly.
Even with the added raisins, this filling occupies less space than the raw apple filling. Some water has already evaporated, and the softened pieces fit more closely together. Turn the inner dough edges outward if necessary to leave the apples exposed.
Brush the dough with melted butter and sprinkle the remaining 2 teaspoons of sugar over the dough and fruit.
Bake at 400°F (200°C) for 40 minutes, adjusting the rack position if needed to balance top and bottom browning.
Microwave the apricot preserves with a few drops of water until loose enough to spread. Brush over the exposed apples, then return the galette to the oven for another 5 to 10 minutes, or until the fruit and dough are well browned.
Let it cool for at least 30 minutes before serving.
Making a Larger Galette
For a larger galette, use a 380 g disk of pie dough and 750 g prepared apples. Scale the remaining filling and finishing ingredients proportionally, about 1½ times the smaller recipe.
Keep the same standards for doneness: tender apples, a browned bottom, and a fully browned folded crust. The clock is useful, but it does not know your oven or your baking sheet.
Serving and Rewarming
Serve the galette the day you bake it. You can let it cool to room temperature and hold it for serving later that day without refrigerating it.
To rewarm, place it in a 350°F oven for about 10 minutes.
Whether you choose the classic apple filling or the brown butter rum raisin version, give the crust enough time to brown properly. That crisp bottom and caramelized fruit are the whole point. A little gap beneath the crust? That is not a dessert emergency.


