I have a vodka habit, but it’s not what you think. My attachment is to baking with it. In 2007, Cook’s Illustrated published J. Kenji López-Alt’s vodka pie dough, and it changed my relationship with pie.
The idea was wonderfully reassuring: replace half the water with vodka to limit gluten development and make the dough more forgiving. But what if you don’t use alcohol for religious or personal reasons? Can you leave it out without losing the qualities that make this dough so reliable?
Yes. With the mixing and handling technique below, this pie dough works beautifully with only water. My results were flaky and crisp, not tougher. The water-only version took a little more effort to bring together, but it was still completely manageable.
Key Takeaways
- Replacing vodka with water produced flaky, crisp pastry using the same gentle handling technique.
- Processing butter with only part of the flour is the key to this dough’s structure.
- Squeeze the hydrated crumbs together rather than repeatedly folding or kneading the dough.
- Chill rolled dough flat before fitting it into a pan to help reduce shrinkage.
Table of Contents
- Why Keep This Recipe Instead of Switching?
- What Vodka Does, and What My Test Actually Shows
- The Real Key: Add the Flour in Two Stages
- Which Flour Works Best?
- No-Vodka Pie Dough Recipe
- How to Roll Out the Dough Without Fighting It
- Chill the Rolled Dough Before Filling or Lining a Pan
Why Keep This Recipe Instead of Switching?
There are plenty of excellent pie dough recipes without vodka. The trouble, for me, is that many have a moment when experience matters more than a measurement.
How much flour should you add while laminating Stella Parks’s dough? How far should you process the cream cheese and butter in Rose Levy Beranbaum’s recipe?
When I make those doughs every week, I develop a feel for them. When I make them twice a year, that feel disappears. I’m a special occasion baker, not a weekly or even monthly baker. I want a recipe that still works when I’m out of practice.
That’s why I’ve stayed with Kenji’s method. Its most important stages are easy to recognize, and the flour is weighed rather than added by instinct.
What Vodka Does, and What My Test Actually Shows
Alcohol doesn’t develop gluten the way water does. That’s the reasoning behind replacing some of the water with vodka: you get liquid that helps make the dough workable without encouraging as much gluten development.
When I replaced the vodka with water, the only noticeable disadvantage was that the dough didn’t clump quite as readily. Once baked, it was still flaky and crispy. I expected more toughness and didn’t find it.
Does that mean vodka was a placebo all along? I wouldn’t go that far.
It reminds me of adding vinegar to pie dough. There is a technical reason to consider alcohol or acidity, but that doesn’t tell us how noticeable the difference will be in a particular recipe, at a particular quantity, with a particular baker.
I don’t work my dough as much as a beginner might. It’s possible that vodka would provide more insurance if the dough were kneaded more aggressively. What I can say is that vodka is optional when I use the gentle handling method described here.
The Real Key: Add the Flour in Two Stages
I think the real magic lies in how the flour is divided and processed.
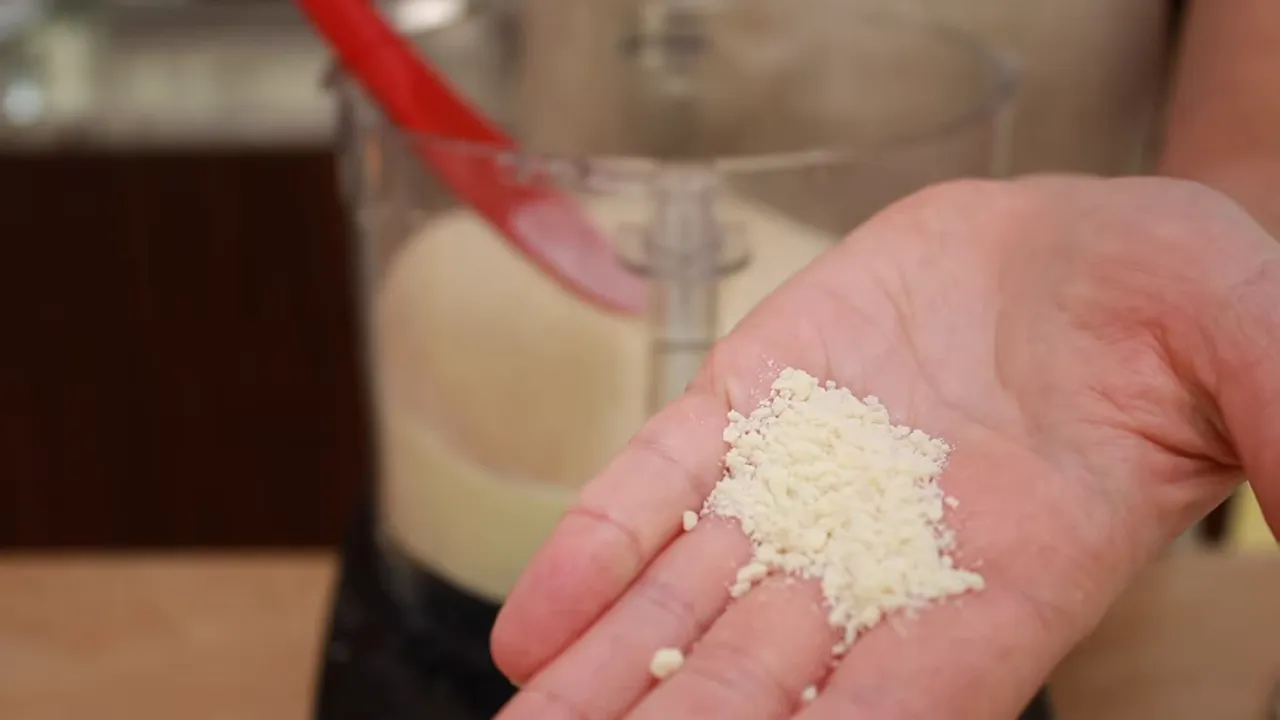
First, all the butter goes into the food processor with only part of the flour. Process it until the mixture resembles fine breadcrumbs or finely grated Parmesan. This is not a recipe where you stop at pea-sized pieces of butter.
Eliminating those large butter chunks helps make the dough sturdy and resistant to leaking. And this stage is pleasantly easy to judge: keep processing until the mixture is fine.
Then toss that flour-and-butter mixture with the remaining, separately weighed flour. These two different textures create layers during baking, giving you flakiness without relying on large visible butter pieces.
The reassuring part is that the second addition of flour is measured. You don’t need to decide how much to work in as you go.
Which Flour Works Best?
The best flour depends on the recipe. In my experience, Kenji’s method gives a better result with King Arthur Unbleached All-Purpose Flour, while Stella Parks’s dough needs a flour such as Gold Medal or Pillsbury Unbleached All-Purpose to behave as intended.
Since removing the vodka changed the liquid, I retested the flour choice too. Both the King Arthur and Gold Medal versions produced very flaky pastry, but I still preferred King Arthur because the baked dough was crisper.
That is my preference for this recipe, not a rule for every pie crust. If you’re curious about the flour itself, King Arthur’s flour guide provides additional product information.
No-Vodka Pie Dough Recipe
Plan ahead: I recommend making the dough the day before baking. An overnight rest is convenient, though the minimum chilling time after mixing is 2 hours.
Yield
- Three discs, about 250 to 255 g each: suitable for free-form galettes or individual 9-inch (23 cm) tart pans.
- Two discs, about 380 g each: suitable for individual 11-inch (28 cm) tart pans or 9-inch (23 cm) pie pans.
Ingredients
- 212 g unbleached all-purpose flour, for the food processor
- 2 teaspoons Diamond Crystal kosher salt, or 1 teaspoon table salt
- 26 g (2 tablespoons) granulated sugar
- 284 g (2 1/2 sticks) cold unsalted butter, sliced 1/4 inch (about 1/2 cm) thick
- 142 g unbleached all-purpose flour, for the mixing bowl
- 118 g ice-cold water, weighed without ice cubes
If weighing the salt, use 5.7 g of any salt with a precision scale capable of measuring to 0.01 g. The two flour portions total 354 g, but keep them separate. Adding them at different stages is essential to this method.
1. Chill the Sliced Butter
Spread the sliced butter on a plate. Refrigerate it for 30 minutes or freeze it for 15 minutes before processing.
2. Process the Butter with the First Portion of Flour
Put the 212 g flour, salt, and sugar into a food processor. Process for 5 seconds to combine.
Distribute the chilled butter evenly over the flour. Give it about fifteen 1-second pulses. These should be full seconds, not tiny taps. Think “one Mississippi” for each pulse.
The mistake to avoid here is stopping too soon. Keep going until the mixture looks like finely grated Parmesan, with no pea-sized chunks of butter remaining. The texture matters more than the exact pulse count.
3. Mix in the Remaining Flour
Put the remaining 142 g flour into a large bowl. Add the processed butter-and-flour mixture and toss thoroughly with a large spoon or silicone spatula.
I mix for about 45 to 60 seconds. You don’t need to worry about developing gluten through excessive mixing at this dry stage. Make sure the two mixtures are thoroughly combined before adding water.
4. Add the Water
Pour in the 118 g ice-cold water. Mix with cutting motions, using a large spoon or silicone spatula, until the water is more or less evenly distributed.
I like a silicone spatula because I can press its back against the dough to encourage it to stick together.
5. Squeeze the Crumbs into Dough
Now use your hands to squeeze the mixture into fistfuls. Some crumbs will fall away. That’s normal.
This is the stage where people often panic because the bowl doesn’t contain one tidy ball of dough. You haven’t necessarily done anything wrong. The water-only version simply needs some patient gathering.
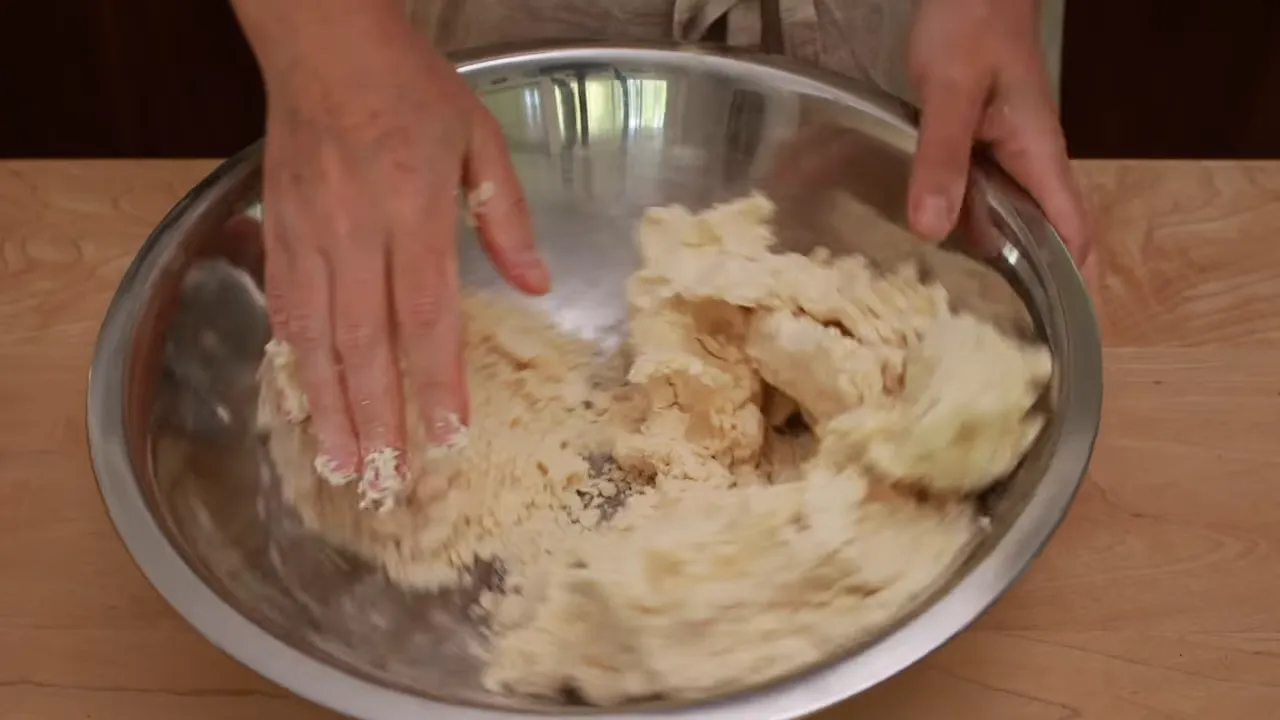
Work through the bowl until the mixture is in small clumps, then combine those into larger clumps. Use squeezing motions rather than repeated folding or kneading to limit gluten development.
If dough sticks to your hands, scrape it off with a spatula or pastry scraper and return it to the bowl.
Once you have two large clumps, press them together. Push the dough firmly into the crumbs at the bottom of the bowl to pick them up. The top surface tends to be stickier than the underside, so flip the dough periodically and press again.
A couple of folds at the very end are fine. You’re finished when you have one cohesive, somewhat lumpy mass.
6. Divide, Wrap, and Chill
Choose the portion size for your baking project. I usually make three discs because I primarily bake galettes and 9-inch tarts.
- Line a small bowl with plastic wrap and place it on a scale.
- Weigh out each portion of dough.
- Shape each portion into a disc with your hands.
- Wrap tightly in plastic.
- Use a rolling pin to flatten the wrapped discs slightly, keeping them as round as possible.
Refrigerate for at least 2 hours, preferably overnight, and up to 5 days.
For longer storage, put the wrapped discs in a freezer bag and freeze for future use. Move frozen dough to the refrigerator 24 hours before you need it.
How to Roll Out the Dough Without Fighting It
Make the Cold Butter Pliable First
Sprinkle the counter and the dough with flour. Before rolling, bash the disc with your rolling pin, keeping its thickness even. This makes the butter pliable without warming it up.
Small cracks around the edge are normal, but fix them now. Little cracks become big cracks as the dough expands. Squeeze the edges firmly to close them and restore a reasonably round shape.
Roll from the Center and Rotate Constantly
Start in the middle and roll away from you. Return to the middle and roll toward you. After each pair of strokes, rotate the dough.
This rotation does two jobs: it helps keep the shape even, and it tells you immediately if the dough is beginning to stick.
If the dough doesn’t move easily, loosen it with a pastry scraper and add flour to the counter before continuing. Don’t wait until it has firmly attached itself to the work surface.
Use the Pin to Correct Uneven Areas
I’ve become a convert to the French rolling pin. Its tapered shape lets me apply pressure to particular areas, giving me better control than a pin with handles. But any rolling pin will do.
If the dough becomes uneven in shape or thickness, tilt the pin and concentrate on the thicker areas to redistribute the dough. My French rolling pin tutorial explains this technique in more detail.
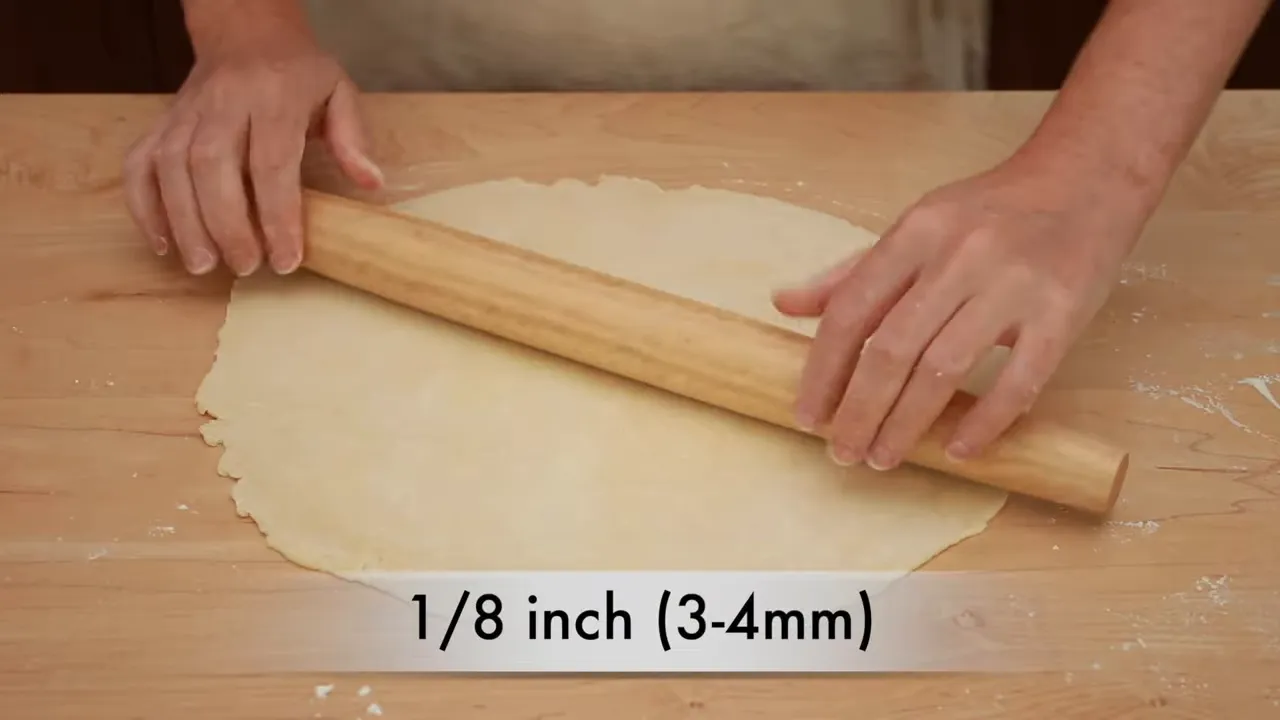
Aim for a final thickness of about 1/8 inch, or 3 to 4 mm.
Chill the Rolled Dough Before Filling or Lining a Pan
To transfer the dough, fold it in half, then in half again. Brush off excess flour from the underside with a pastry brush, move it to a parchment-lined baking sheet, and unfold it.
If you’re in a rush, you can fill and bake it immediately. But the texture will be better with at least 20 minutes of chilling after rolling.
For a pie or tart pan, the order matters:
- Chill the rolled dough flat.
- Let it soften at room temperature just until it becomes pliable.
- Fit it into the pan.
Chilling the dough flat before fitting it into the pan helps reduce shrinkage during baking. If you refrigerate the rolled dough for longer than an hour, cover it with plastic.
From here, follow the filling and baking instructions for your particular pie, tart, or galette. This is the dough method, not a single baking schedule for every possible filling.
The biggest lesson from this experiment is reassuringly simple: you don’t need vodka to keep this recipe reliable. Process the butter thoroughly with the first portion of flour, mix in the second portion by hand, and squeeze the hydrated crumbs together without turning the process into bread kneading. That’s a dough I can trust, even when I only make it twice a year.
|