Two pieces of pie dough. The same oven, the same temperature, and the same baking time. One comes out beautifully browned underneath. The other is disappointingly pale.
The difference? The piece of metal sitting under the dough.
I used to think that getting a crisp tart bottom was mostly a question of technique: pre-bake the shell, freeze the dough, move the oven rack, add a pizza stone. All those things can matter. But a little experiment convinced me to replace my false-bottom tart pan with a perforated tart ring. It also helped explain why a method that worked beautifully in my kitchen could produce a soggy mess in someone else’s.
Key Takeaways
- A perforated, bottomless tart ring let my crust brown better on a baking sheet.
- Freezing a fruit tart shell can replace pre-baking, but equipment strongly affects the result.
- Custard fillings still need a fully pre-baked shell with a thoroughly browned bottom.
- Chilling rolled dough before shaping and folding the overhang inward helped my tart sides stay upright.
Table of Contents
- Why Can a Galette Skip Pre-Baking?
- Freezing the Shell Was Only Part of the Story
- The Experiment That Changed My Tart Equipment
- Choosing a Tart Ring and Adjusting the Recipe
- How I Bake a Fruit Tart Without Pre-Baking
- When You Still Need to Pre-Bake the Crust
- How to Keep Tart Dough From Shrinking
- How Deeply Should You Prick the Dough?
- What to Do With the Dough Overhang
Why Can a Galette Skip Pre-Baking?
A galette presents a rather annoying question. You put raw fruit on raw dough, fold up the edges, and bake it on a sheet pan. The bottom comes out crisp. No beans, no pre-baking, no elaborate intervention.
Put that dough in a tart pan, however, and suddenly pre-baking seems essential. Why should adding a pan make the job harder? Yes, these are the sorts of questions that keep me up at night.
My objection to pre-baking, also called blind baking, isn’t just the extra work. By the time a pre-baked shell has finished its second trip through the oven with the filling, the edges can become too dark and tough.
That is why I was so excited to discover an alternative: freeze the shaped tart shell for an hour, then fill and bake it without pre-baking. In my kitchen, this produced much tastier edges without sacrificing a crisp bottom.
Then other cooks tried it. Some had excellent results. Others had soggy bottoms. Clearly, I was missing something.
Freezing the Shell Was Only Part of the Story
I started using the freezing technique around the time I got my little Breville oven. I loved how well it browned the fruit, so that became my usual tart-baking oven.
When I tested the same frozen-shell method in my full-size Wolf gas oven, I reproduced the sogginess. At first, I blamed the oven. But there were actually two important differences:
- The Breville’s heating element was very close to the tart.
- The tart sat on the black round baking sheet that came with the oven, which browned the bottom exceptionally well.
In other words, I had gotten lucky with my equipment. Freezing alone wasn’t a guarantee of success.
A pizza stone and a high baking temperature helped in the big oven. The center of the crust was still a little pale, but at least it wasn’t soggy. That was an improvement, not a satisfying explanation. I could bake a galette in that same large oven without a stone or pre-baking and still get a crisp bottom.
It was time to isolate the pan.
The Experiment That Changed My Tart Equipment
I rolled out a piece of dough and cut it into two pieces. One went directly onto a parchment-lined aluminum baking sheet. The other went onto the removable bottom of my tart pan, sitting on that same sheet.
I treated both pieces alike:
- Pricked the dough with a fork to reduce bubbling.
- Weighed it down with beans wrapped in foil.
- Baked it for 15 minutes.
- Removed the beans and baked for another 5 minutes.
The dough sitting directly on the parchment-lined baking sheet browned much more deeply underneath. The piece on the tart-pan bottom stayed noticeably paler.
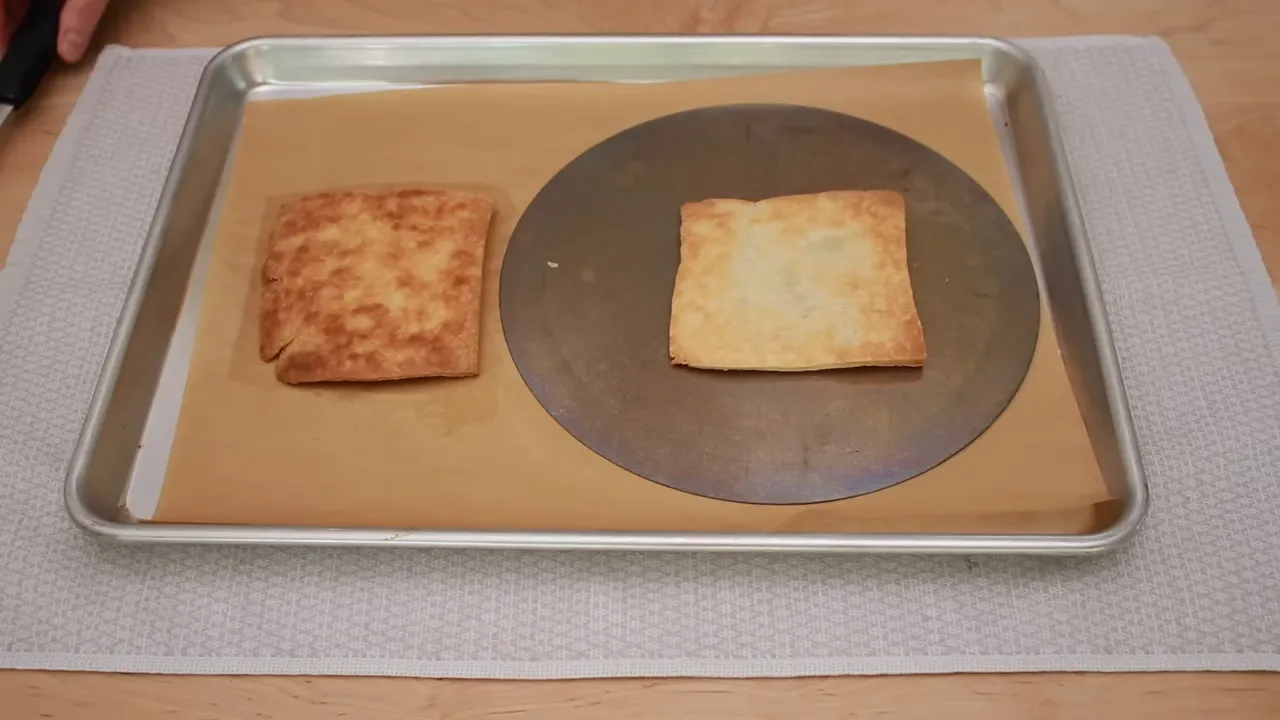
My research pointed to a likely explanation: traditional tart pans are commonly made from tin-coated steel, which conducts heat less effectively than an aluminum baking sheet. In this test, that extra tart-pan bottom made a very visible difference.
Professional-style tart rings offer a wonderfully simple solution. They don’t have a removable bottom. They have no bottom at all.
The dough rests on the parchment-lined baking sheet instead. A perforated ring supports the sides, while its little holes expose more of the dough to the oven’s radiant heat and help moisture evaporate.
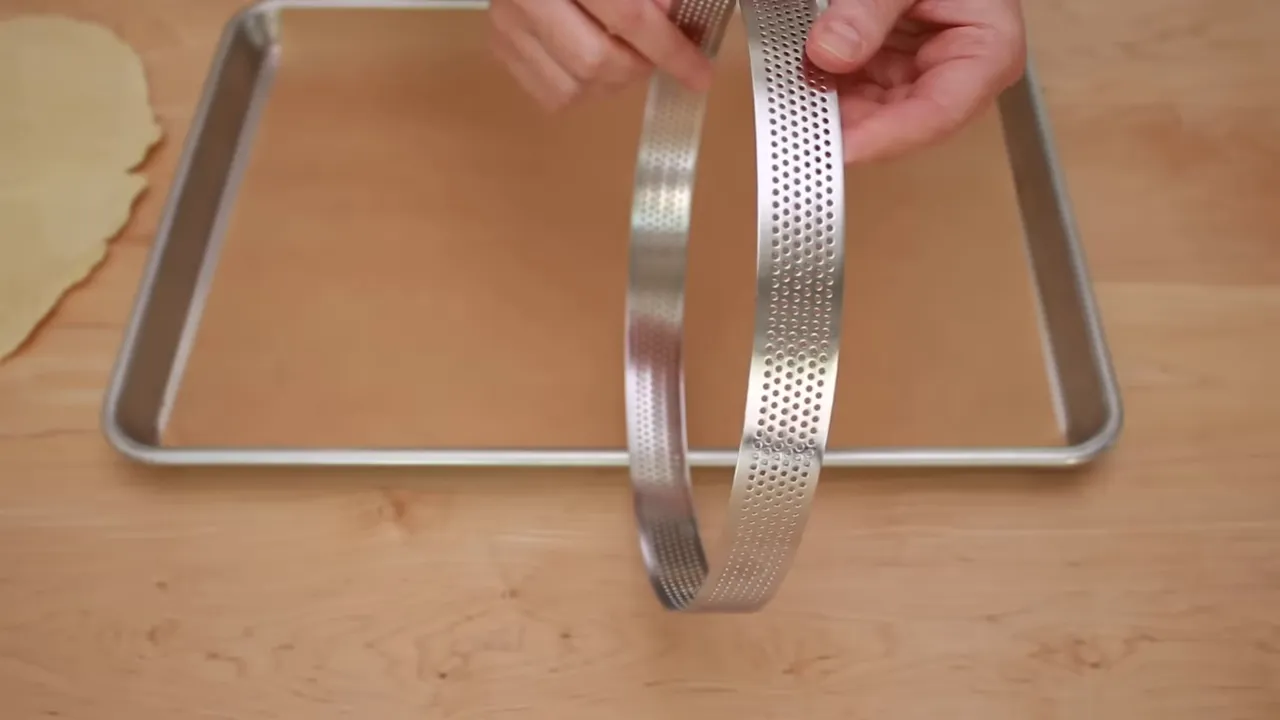
I bought a ring and tried it in my Wolf gas oven, on a shiny baking sheet, without a pizza stone. I froze the shell for an hour, filled it, and baked it without pre-baking.
The bottom was beautifully browned. Finally, my tart was getting some of the same advantages as a galette.
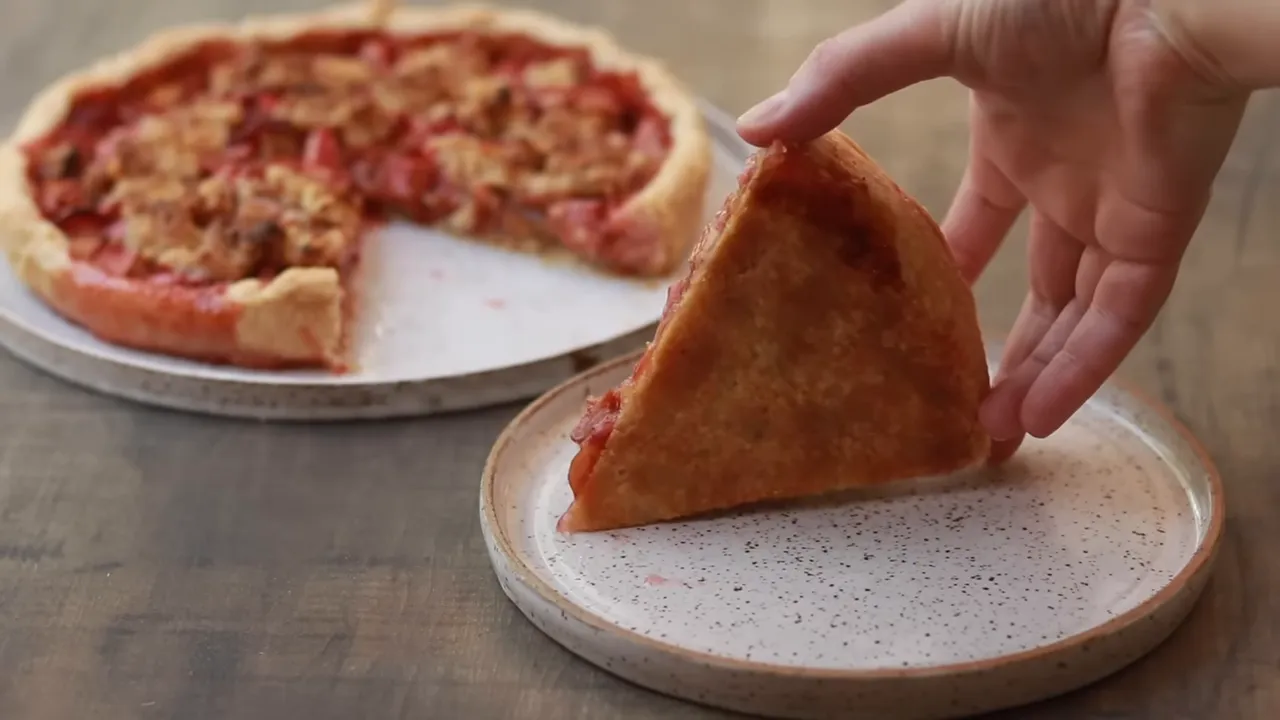
Choosing a Tart Ring and Adjusting the Recipe
My old false-bottom tart pan was 11 inches in diameter. Finding a perforated ring that large proved surprisingly difficult. I did find a larger option, but it was too shallow.
After trying several, I preferred a ring that measures 9 inches across and 1 inch tall, approximately 23 by 2.5 centimeters. Height matters, not just diameter.
This is the perforated tart ring I use. I bought it with my own money; that affiliate link earns me an Amazon commission.
The smaller size also changed how I portion my dough. The pie dough batch I had been dividing into two discs for 11-inch tarts now gets divided into three discs of 260 grams each for the 9-inch ring. A larger disc would fit, of course, but there is no reason to create unnecessary scraps.
For fillings developed for my 11-inch pan, I multiply every filling ingredient by two-thirds to fit the 9-inch ring. That applies to my tomato, onion, and Gruyere tart, plum tart, and rhubarb tart.
How I Bake a Fruit Tart Without Pre-Baking
The exact temperature and timing depend on your oven and baking sheet. For a frozen fruit tart shell in my perforated ring, on a shiny baking sheet, this is the schedule that works for me:
- Freeze the shaped shell for 1 hour. Then add the filling.
- Bake in the bottom third of the oven at 400°F, about 200°C, for 30 minutes.
- Reduce the temperature to 375°F, about 190°C, and bake for another 15 to 20 minutes. The fruit should be bubbling and the top browned to your liking.
Treat that as a starting point for this equipment setup, not a promise that every oven and sheet pan will behave identically. My original freezing experiment taught me that lesson rather thoroughly.
When You Still Need to Pre-Bake the Crust
Don’t throw away your beans just yet.
For custard fillings, including quiche, pecan pie, and lemon tart, I still fully pre-bake the shell. Custard prevents the dough underneath from baking properly, so the bottom needs to be completely browned before the filling goes in. A better ring does not eliminate that problem.
My Pre-Baking Method
- Dock the dough. Prick the bottom with a fork.
- Line the shell. Crumple a piece of parchment, open it up, and fit it against the dough. Crumpling helps it conform to the shell.
- Add dry beans or other pie weights. Work them into the corners so they support the dough there, too.
- Bake the ring-lined shell in the middle of the oven at 350°F for about 20 minutes, or until the sides feel dry.
- Remove the parchment and weights. Prick the bottom again and continue baking to the doneness your filling requires.
If you are pre-baking for a non-custard filling, roughly another 5 minutes may be enough to make the exposed surface of the dough dry to the touch. For a custard, continue until the bottom is thoroughly brown. A dry-looking but pale shell is not the goal.
How to Keep Tart Dough From Shrinking
Most recipes tell you to roll the dough, fit it into the pan, and chill it for at least 30 minutes before baking. That helps. But I found an extra chilling step works even better.
Chill the rolled-out dough before fitting it into the ring. Give it 30 minutes to relax and contract while it is still flat, rather than waiting until it is shaped into your carefully constructed tart shell.
If the chilled sheet becomes too stiff to handle, let it soften at room temperature for a few minutes. Fit it into the ring, then chill it again. For the fruit-tart method above, freeze the shaped shell for an hour before filling.
With this approach, my dough stayed wonderfully snug against the ring after baking. One rhubarb tart did have a little spillover, but that was because I was trying to squeeze in the last of my rhubarb. The dough was innocent. And the tart was delicious.
How Deeply Should You Prick the Dough?
I used to advise pressing the dough with a fork without poking all the way through. My reasoning was that complete holes might let the filling leak.
Then curiosity got the better of me, and I tried pushing the fork all the way down to the metal.
Nothing terrible happened. The dough closed up as it began to bake, and the filling didn’t leak through the fork holes in my tests. So I no longer worry about being delicate when docking the shell to reduce large bubbles.
What to Do With the Dough Overhang
For about a year, I left the dough hanging over the outside of my tarts and trimmed it after baking with a rolling pin. That worked well with my old fluted pan and made thinner, more delicate sides.
The smooth tart ring was another story. Without those fluted edges, removing the baked overhang neatly became more difficult.
For the ring, I prefer this method:
- Trim the raw dough to leave about 1 inch of overhang.
- Fold that extra dough back inside the tart.
- Press it firmly against the ring to thin it out and secure it to the walls.
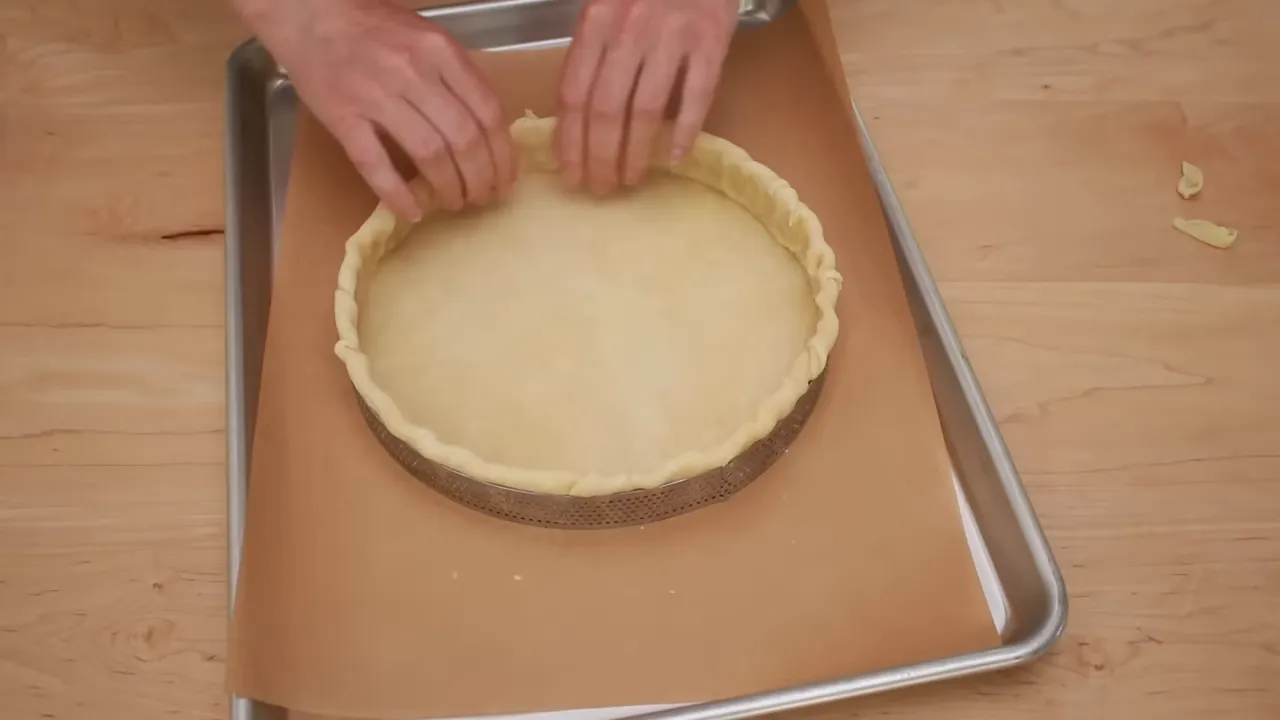
These sides stayed upright during baking and came out nice and straight.
Why not simply run a rolling pin over the raw shell and cut the dough flush with the rim? In my experience, that often leaves sides that shrink down during baking, which can lead to overflowing filling.
The combination that made the difference for me was not one magical trick. It was a bottomless perforated ring, a baking sheet that lets the base brown well, properly rested dough, and an edge shaped to stay put. Freeze the shell when the filling allows it, pre-bake when it doesn’t, and give the bottom of the tart as much attention as the beautiful fruit on top.
|


